

A ('nother) belated return to blogging, the first to show several large projects completed since Christmas... This is going to be another excruciatingly-detailed, deep-dive into the evolution of the project, so congrats if you make it all the way to the end.


Yep, Steampunk. A genre I love working in, but which in these days of climate-aware post-Imperialist awareness, is a little difficult to work in without feelings of latent guilt. Hey, I also made a lot of it with plastic, so three for three so far. Ah well, in for a penny, in for a pound;
Earlier in the year, RMWeb (the online model railway forum) and British Railway Modelling magazine ran one of their 'Cakebox Challenge' competitions. In a nutshell, this is where you're challenged to build a railway-related scene in a standard set of dimensions, that of a cakebox; 8 inch squared, by 6 inch high. This is my third shot at a Cakebox, having managed to get into the mag with the second round (Industry-themed); the basic rule of this one is that it needed to have two recycled items.
OPTION ONE... MODEL OF A MODEL VILLAGE

Exploring around for a concept, I thought I'd try something in 1/32nd scale (that I was also doing at the same time in 1/10th for another competition) and do a model of a model village. I thought basically I'd revisit my earlier Britannia Model Village project (above) via...

...the seaside miniature railway that I did for the first cakebox.

Working in 1/32nd scale, as this mock-up shows -using a somewhat unique visiting clientele for the model village, because it was raining too heavily to go out to the shed and get the box of proper figures- I decided in the end it would look too much like the seaside cakebox, and I didn't want two projects on the same theme running at the same time. More on the larger 1/10th scale project in an upcoming blog post too, depending on when it's published in a mag.
OPTION TWO... STEAMPUNK

After the Britannia Model Village back in 2007/08, I did a Steampunk-themed project that was sort-of thematically linked to it. I'm an enthusiast of the genre, and this was part of a combined photomontage/miniatures shoot done for an exhibition at Bradford Industrial Museum.

One of the features was the overhead monorail, done because I wanted something up in the sky to fill the top-halves of the pictures (beyond all the gratuitous airships), but thought that a brick railway viaduct would be too intrusive.

It was done with 4mm stock (bashed around Dapol kits mainly) on laboriously-cut card girders. Thank heavens for the invention of the laser cutter...

...and it drew criticism from some railway modelling colleagues for being not Steampunk enough. Apparently the locomotives should have been about 5 times the size, with names like 'Goliath'.

I'll show them, I thought... I started on a 1/32nd scale articulated monorail loco, which would have been part photography prop, and part planned model for a line around the garden. I've always wanted a garden railway, and figured an elevated line resting on posts sunk into the ground would be a novel and less obtrusive way to get around disturbing the flower beds.

However, working on a ridiculously tight budget was tricky, and it took up way too much space, so the project was dropped.
Speaking of past projects, I wanted to make whatever I did for this Cakebox gloomy and atmospheric, with working steam effects, as per the Industrial cakebox I made for the previous round of the contest...

...and the Engine Shed project I did a couple of years back.

So I waded back through my sketchbooks from the time of the first Steampunk project, for all the various designs that I'd come up with, but didn't have time/budget/opportunity to pursue back then.
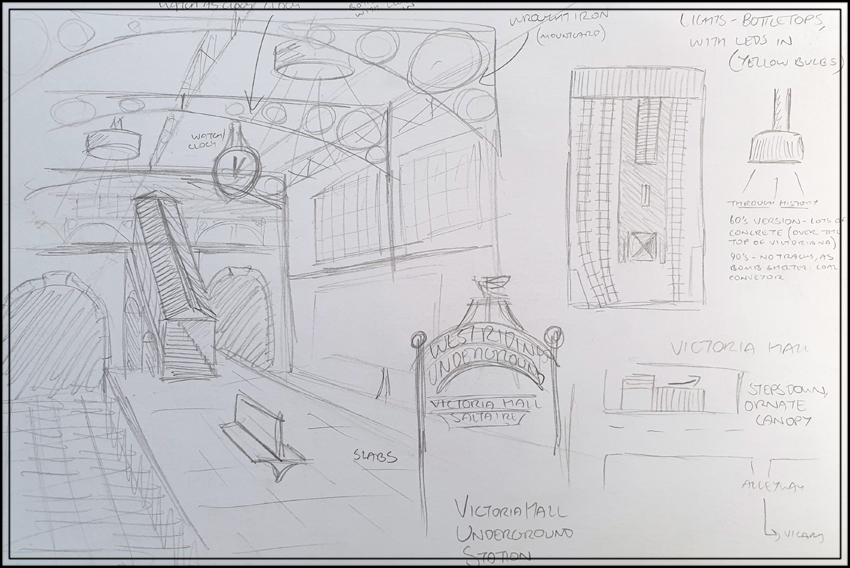
I thought of doing a tiny bit of a station, incorporating elements of the planned Saltaire Underground (island platform, the roof)...

...and the planned Monorail station itself (platform with subway steps heading down to street level, stone walls with large windows).
That's what I like about the Cakebox Challenge, it's a chance to try lots of different ideas that I normally wouldn't have time or chance to do.

And then, the problem reared its head (as they inevitably do with my projects); up to this point. I'd still been thinking of working in 1/32nd scale, to re-use existing figures and detailing parts, but the available dimensions don't give you much room to manoeuvre in such a large scale.
Eventually I realised I'd need to work in 0-scale (in order to fit the most detail in, and use some interesting figures to help convey the scene), and that by flipping the cakebox round onto its side, I could get 6-inches of width for the scene, and the height and length at 8 inches so I could incorporate a nice, high roof. There wasn't going to be room for much, so I decided to go for the very end of a station platform, with a subway at the end dropping down, and a doorway in the wall hinting at a larger station beyond.
STARTING THE BUILD

I spent some time planning to work in traditional materials like card and MDF, but then the post-Christmas lockdown kicked in, and I couldn't get to the DIY shop. However, I could get access to my laser cutter and a ton of acrylic scraps from previous jobs, whilst I had a day to kill waiting for the car to be fixed at the garage down the road from the cellar I use as my workshop. This would actually help somewhat, as plastic would fare better than MDF with all the steam and smoke effects.

I also had some stone-textured plastic sheet knocking around, technically reserved for another project, but with the country in the fore-mentioned Lockdown and the model shops closed, I wasn't likely to be able to get hold of any more before the project deadline, so what the hell, I decided to use it.

After mixing up some Yorkstone-ish paint from the somewhat limited selection of tester-pots I had to hand...

...I weathered the hell out of it to give it a grimy, intensively used appearance.

The ornate brackets to support the track beam for the monorail were designed to be quite squat, to give as much height as possible for any planned trains to fit in the scene, whilst equally looking strong enough to take a massive amount of weight, and finally allowing a view down below the track. I had a rough idea of sitting this diorama above the smaller-scaled Industry cakebox from the earlier challenge, to create the effect that the station is perched up above the rooftops.

Keeping with the recycled theme, the underside of the platform is built up from electrical connector blocks, cupboard shelf supports, and bits of toy girders, to create a space in which I could hide the batteries for the working lights. The monorail beam itself has some toy TT-gauge track on a laser cut gantry, detailed with bits of Lego technic.

The roof beams needed to be small enough to not completely fill the overhead space, whilst providing as much clearance as possible for the planned locomotive (and also looking like they'd actually hold up the weight of the roof).
GOING LOCO
Ah yes, the locomotive. On its own the scene didn't really seem to scream "STEAMPUNK, OLD CHAP!" loudly enough, so I thought I'd need a locomotive for added interest. Fitting in a massive loco, or even a bit of a loco, was going to be a tricky proposition in such a small space mindyou.

I looked back through my sketchbooks again, remembering I'd taken some inspiration from the long-closed Liverpool Overhead Railway, an electrified commuter line that ran along the waterfront. There's a carriage and a bit of track preserved in the Liverpool museum, a venue we visit pretty regularly. Anyway, the railway once upon a time had a dinky little engine known as "Lively Polly", a Kitson-built machine as long as it was tall. A nice squat little prototype to use as a basis for something similar here.


The plan was to use a toy chassis, roughly to TT gauge, as I had an inkling of an idea that I might be able to have this as a runner on some sort of layout, at some point in the future.

Following the rough inspiration from "Lively Polly", I kept the dimensions pretty squat, so I could fit as much of the loco in-shot as possible.

A box was constructed around the chassis, ready to build the loco around.

The basis of the loco would be this, a body from a standard-gauge 1/32nd tank locomotive- I'd used the chassis for a garden railway build in 2019.

Some chopping down, and a much larger boiler/saddle tank was fabricated from a curry powder tub, to try and help the design be a bit more Steampunk.

I ended up changing the design a bit, and losing the operational chassis angle to drop the height enough to not dominate the scene. Should I ever decide to make a working railway, I'll have to try and find a way to retrofit a working chassis, frankly though I was just overcomplicating things for this build.

A lot of plasticard and scraps, bits of toys, model kits, anything and everything to complicate-up the outline of it were added as I went along.


Quick test in the scene- massive, Steampunk, but not too over-dominating hopefully.

FIGURING IT OUT

I'd started out this project planning on working to a tight budget and re-using some 1/32nd Britains figures I'd already modified, but with the switch to 0-scale, I needed some new figures. I decided it would be an investment, and splashed-out on some S&D white-metal figures from their extensive range (that I could up-cycle into another project later to recoup some of the costs).

A mix of station staff and passengers, only one vaguely military type as I didn't want to go for that angle to the genre.
STEP-UP

I wanted to try and create as many angles for photography as possible, so I'd planned for a set of subway steps up onto the platform. I struggled a bit for sorting the stairs, and had wondered about laser-cutting some. In the end, I modified some 4mm scale steps from the Dapol footbridge kits.

I'd planned for black/white tiled walls, but changed my mind when I realised it would be too tricky to do it neatly once it was installed.


The top stairs, where it fitted in to the platform, looked like it needed a bit of work, but generally it gave the effect I was after when it was all slotted together.
WINDOWS (18)95...

I decided the windows needed to look nice and ornate (I used to work at Carlisle Citadel Station, which is faux-gothic in style), and I'm glad that I chose to do this on the laser cutter, as doing this by hand -or modifying the Hornby Church kit, as was an early intention- would have been a bit of a sod.

As part of the incorporating a recycled element, I thought I'd have the one bit of cliché of the genre, and have a Gratuitous Cogwheel for the big window in the end wall.

This was a bike wheel part, from the pack of odds and sods up in the loft. As the song says, 'Just glue some gears on it, and call it Steam-punnnnk...'

A quick brushing with citadel acrylics followed.

For the stained-glass, I drew something basic with a sharpie- it didn't need to be too neat or detailed.

Coloured in with more sharpies.

It gives the effect I was after, at the end of the platform. Most of the time it would be blurry and out of focus anyway, in the background to the pics, and hopefully relatively subtle.
LIGHTING EFFECTS

I bought some lights off eBay and Amazon, pretty cheaply; these are sold as 00 scale, and they're bloody massive, oversized even for this scale to be honest but at least it adds to the 'everything is bigger' look of Steampunk.

The lights were loosely tacked-in, several large lamps on the platforms, a stop-light on the buffers, and some downlighters on the roof spars (though I managed to burn-out one of these with a minor mistake with the soldering, annoyingly, but at least it was at the back so wouldn't be too noticeable.).

Quick test again, and then I could get on with gluing the lights properly then hiding the wires.

The batteries would slide under the platforms, to help keep it all within the size restrictions of the Cakebox.
POSTERS

As per usual practise with my projects, I decided to do all the posters and signage myself, as it would help set the scene (and anyway, I enjoy doing these custom posters). This time, I decided to do the posters with the same model figures I'd be using for the layout rather than 'real' humans, to aid consistency; the above 'bathing beauty' for the cliché travel poster, as I wanted there to be a hint of somewhere a bit more glorious and sunny to contrast with the grimy, soot-stained station. As a further in-joke it would be advertising Port Eden, the fictional seaside resort being developed for the 1/10th-scale competition build I was doing at the same time. It's like a shared cinematic universe, only much lower-budget than Marvel manage...

I developed some shots from other projects on the theme (incidentally I might do something in another post on these projects) to create the posters.

The posters in place, helping to fill all those blank walls with a bit more detail, even if most of them are too small to see the majority of the text. Really I was just after the effect.
RAISING THE ROOF

The roof was the final item to be installed, as I wanted to be able to access the platforms easily for all the other bits of detailing.

The glazed roof, with its ornate framing, was not something I was looking forward to tackling frankly, until I found some scrap clear acrylic with the carrier film still attached, which would act as masking.

Engraving on the laser, peeling bits off strategically, spray-painting, then more peeling... took ages, but it worked.
TEST SHOTS

Everything was set up, with the lighting all ready to go; probably a neater way of doing it for a more permanent, long-term build, but I went just for the 'multiple batteries' way of doing things for the sake of expediency. Also note the track beam is kept removable, to make it easier to move stuff around the scene, and for later storage.

The loco isn't quite finished in this shot, but this test on the workbench showed the effect I was going for. Something of a relief, as it was too near the deadline to make any major changes.
THE FINISHED PICS- BY DAY...

Setting the tone, a be-monacled Jacob Rhys-Mogg reads his paper whilst waiting for the train. Though in reality he'd probably have a chauffer-driven airship.

One of the angles onto the set I really wanted, up the stairs into the station, which was visually extended by placing a mirror at the far end of the set. I added some more stone-effect plasticard and details around the outside of the set too, to give the impression the pics were taken on other bits of the station.

One of the mini-humidifiers was placed between the track beam and the platform, and the model was shot in natural light on a sunny day. The shafts of light streaming down were exactly the effect I'd envisaged.

Then the loco was put into the set. and manages to not completely over-dominate it, as I'd hoped.

Another angle I wanted onto the set; despite the restricted size of the Cakebox, I'd planned in advance views like this, to try and make the set appear bigger, like you were looking through from an adjacent platform.
THE FINISHED PICS- BY NIGHT...

Having done some pics by daylight, I took some more pics in the dark as I thought I could make the shots a touch more dramatic.

Honestly, it's all glamour, this sort of shoot... I'd really like a proper studio, rather than balancing between the washing machine and the kitchen table.

Looking suitably murky, a foggy night in Old Saltaire Town...

I tried to do the photographs as if it was a documentary set, someone allowed to wander around and take pictures of the station staff and passengers on a quiet evening, with the figures in relatively candid poses.

If I have a regret with the otherwise excellent figures, it's with the varnish I used, which has come out a little too glossy. I wish I'd had time to buy a can of matt spray, but with Lockdown still in effect, I couldn't get out to buy one, or find any online that would have arrived in time.

IN CONCLUSION...

It's rare for one of my projects to go as I planned, and apart from the little hiccup at the start with struggling to work in 1/32ndd and having to switch to working in 0-scale, this turned out pretty much as I wanted. It was also nice to finally be able to do the Steampunk Monorail ideas that I'd been planning, but never had the chance to realise, back in 2009. Honestly, I really love these Cakebox Challenges, as they're nicely contained little projects; I only got into doing these right at the tail end of the first rounds (they'd been running for a few years), happily Phil Parker and the team decided to resurrect the challenge as something to do in the Lockdown to help get peoples modelling mojo going.

To my amazement, considering Steampunk is still rather niche amongst the railway modelling majority, I won! Featured in the British Railway Modelling mag, and a price of £75's-worth of goodies from JS Models; Home (jsmodels.co.uk) There were some excellent entries that I was up against, the recreation of a scene from "The Sweeney" being my personal favourite.

Winning will allow me to do another project on the to-do list, a much bigger version of the Industry Cakebox, using some of the low-relief mill/warehouse structures that JS models make, buildings that are way too big for me to do on my own laser cutter. I'm looking forward to doing that build as a project for the Autumn. In the meantime, I'll probably be posting about another project I did in the Spring for the next blog


Greta. environmentalists, anti-Imperialists, or Thomas fans. Not sure who I'd be worried more about potentially offending. Thank goodness this blog is so far from the mainstream, and below the radar of the real cancel culture, that hardly anybody reads it...
No comments:
Post a Comment