Sunday 29 November 2015

Train Set versus Model Railway


Continuing the vague theme of 'train set vs. model railway', a little post on something I'd made last year.  With the Foster Childs moved in, surprisingly all three females combined an interest in both girly tat with mechanical items.  Particularly, eldest Child wanted a train set at Christmas.  So I decided to build something.  Small house, so needed to be small and self contained, relatively basic but with play value.

As a legacy from the Britannia Model Village I had a quantity of some now-not-produced items known as XTS Train Sets.  These were a marvelous, modular system of coarse-scale N gauge mini train layouts.  They were rather nice items which originated in America I believe, not too heavily imported into the UK but they turn up on Ebay from time to time.  With nothing else planned for them, I set about working out what to make.  As the above pic shows, with all the components (and a few more off Ebay) a somewhat sprawling layout was vaguely planned, but I decided to scale it down a bit.


I decided to mount it on an A3 noticeboard to save a bit of time (it had green felt which made a nice grass covering, and saved me having to build a baseboard, and could be hung on the wall for storage).  Bluntly, doing the old Self Assessment Tax Form delayed starting on the project, so it needed to be achieved quickly.


Trial-fit of components proved I'd need to do some hacking and sawing of the tracks to get things to fit, providing a suitably exciting layout.


Trackplan sorted out, and track modified to a more customised shape, it still looked a little bland and boring.  This wasn't exactly going to be the pinnacle of railway modelling, but I didn't want something so basic.


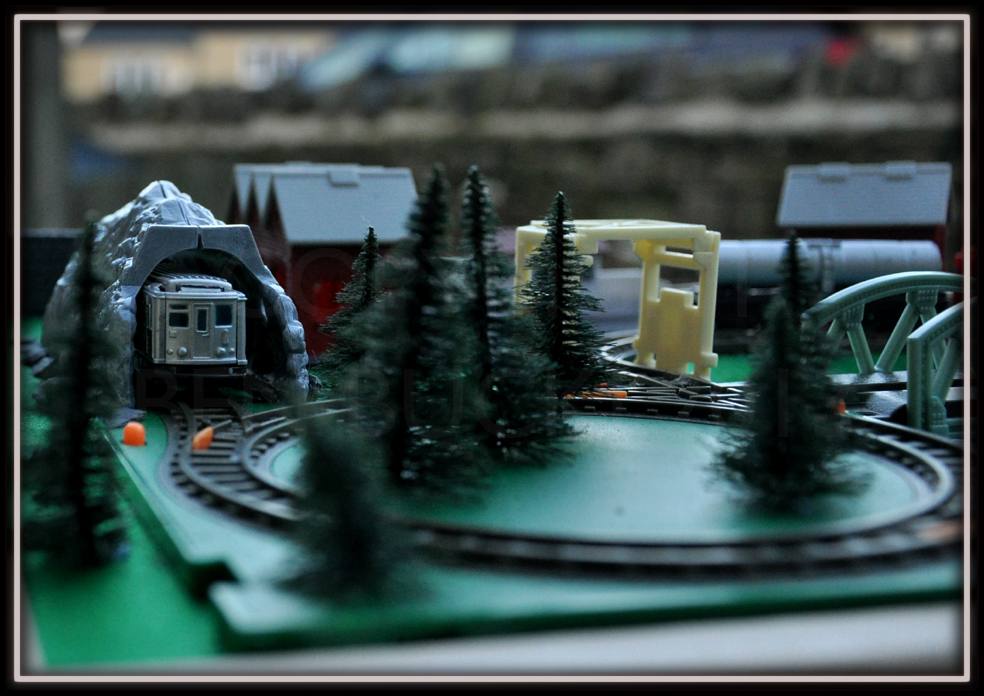
A nights work, and the above was the result.  The felt/card board was sliced through with a scalpel, a second sheet of tougher wooden board glued on underneath, and a passable representation of a river was created.  A road from black foam, and some toy buildings from an ancient, rather battered Thomas train set bought cheaply online, and a few trees from the model railway bits-box, all providing a bit more landscape.


Its not going to win prizes, and its not going to get the golden trophy at the Warley Show or anything, but it serves a purpose, hopefully to be a gateway to more model making (Eldest Child is quite practical at that sort of thing), but equally if she decides to just be interested in boyfriends, phones, and unicorns, it won't be too much time effort or money wasted making it.


It has quite good play value too, as demonstrated by the fact that (in time honoured fashion) the adults spent more time playing with it at Christmas than the Childs did.  Two trains can run at once, with the possibility of the inevitable collision adding a note of drama to proceedings.


It was well received, and has proved reasonably robust.  And to this year; Middle Child has gone straight onto the 'dolls, ponies and boys' route to growing up stereo-typically, but Youngest Child want a train set.  So something similar, a bit simpler, using some of the other XTS components is under construction in time for this Christmas.  More to follow...

[assuming this blog still has any regular readers, given its sporadic updating, apologies.  Couple of commissions and the Self Assessment have rather slowed down photography and model making of late, but I'm trying to get back into the swing of things.  A solution to the storage problems for built models should allow me to get making again, with a couple of big projects to complete, not to mention a ton of Airfix kits bought in last years Black Friday sale to build...]

Sunday 8 November 2015

Playing Trains


Being as I'm bogged down with doing a big project at the moment, but unable to post info about it as its unfinished, I thought I'd put up some info on a little build I did last year.  A lot of my miniatures building tends to be based around doing prop builds for photography shoots.  And the big photography project I was involved with in 2013/14 was "The Home Is..." which basically was building a living room set, and photographing it in unusual locations (playing on themes of where people felt relaxed etc; there's more over on the Ribbon Photography blog anyway, here http://ribbonartandphotography.blogspot.co.uk )


One of the shoots we wanted to do was at a railway station, and with access to a location for a whole morning, we thought we'd experiment with some of the other room sets beyond the core 'living room' set, and that we'd try some 'hobby rooms' to capture the feeling of someone relaxing in a domestic environment, but with the set located outdoors.  Obviously a good place to start given the locale would be someone playing with a train set. 


Of course, a problem with mainly doing model building for photography is that I don't actually have a model railway to use, so decided I'd have to build one, as quickly as possible.  And preferably without spending anything.  So it was out with the old toy trains leftover from the Model Village build, some scrap wood, and a quickly sketched plan for a fairly complex and photogenic-looking railway based off my old childhood train set.  It was designed to fold-over for transportation, so not to take up too much space but to be big enough to show decently in the pics when unfolded and assembled on-location.


The problem was that it became a wee bit too complicated, and delays caused by prepping the house for the Foster Kids moving in meant there wasn't time to finish it, especially as it was basically going to be a one-use photography project.  So it was time to do something a bit more simple.


The actual build took a morning, come the finish; a derelict Ikea A1+ sized frame turned upside down with the plastic out of it and replaced with wooden sheet, some of my old model railway buildings, an oval of chunky plastic toy railway track, and a load of hanging-basket liner would have to suffice.


The above shows the slightly slip-shod build quality, but then a lot of the problem with the earlier build was that I should have realised I wasn't making an actual model railway, I was making a train set, furthermore it had to look just good enough for the picture, to appear in a single shot, not too large.


The actual 'look' of it is something I thought about for some time; there is a definite distinction between "Train Set" and "Model Railway", by which I mean a Model Railway tends to have months, years, lavished on it, a perfect replica of a landscape.  A Train Set tends to be more simplified, less scenery, definitely more emphasis on trains whizzing about in a circle than realistic operation.


After years in storage, the old buildings were in need of a bit of TLC, but were used for timescale purposes, but also with more than a hint of nostalgia of my old train set when I was little.


Also worth mentioning the train that mainly appeared in the shoot, an ancient Triang DMU which was my Dads.


And so the background, a nice rake of engineers wagons...


...and the shoot, with a few other bits of set dressing quickly improvised for this test shot.


It...well, it looked alright in the photos, but we decided following the test shot and with time running out for the project, we decided to junk the 'hobby room' concept without further development.  But I wanted to use elements of the idea in another train shot, so it was back to the original plastic toy trains, and a plan for a mini-layout which could sit on the floor beside the living room set.  


Quick mock-up, but once again time constraints (with Foster Childs due to arrive imminently) saw it canned.


So to the final shot, and a rather more subtle approach...


...spot the train; in this case another little dose of nostalgia, and an ancient model kit of a 9F steam loco built by my late Uncle Verdun; nice to have it appear in the project.

So that was the total of the miniature builds in a project which took a great deal of a year; but as a future post will show, not the only excursion into 'Train Set vs Model Railway' territory...

Wednesday 4 November 2015

I Want That In My House!

So another big gap in blogging since the Dalek business...  Partly because after the verrrrry hectic month which resulted from the Dalek brief leaving me wanting a break, but also partly because I have a major sculpture commission on at the moment, though the good news there is that it is resulting in the mass-build of about a dozen concept models.  I'm not going to put anything about that project up just yet, until I have some finished models to show for it, so instead, a new feature: 

I Want That In My House!

I don't much go in for wishlists, as a rule; but occasionally I'll see something which might be useful, even desirable, and which is entirely out of reach.  Particularly as I don't have a studio or even a spare room to work in, and I also don't have a limitless pot of cash for projects (as my endless reliance on Poundland tat and old model kits will attest).  Nevertheless, for the sake of something to post:

National Railway Museum, York 


Alright, I want this to run around the outside of the house... if I had a big house.  And Grounds rather than a postage stamp back garden in an area notorious for metal theft.  But what sort of self respecting railway enthusiast wouldn't want a miniature railway?  This is the Deltic (powered I believe by a motorbike engine) on the recently-reopened miniature railway at the museum.


And above is the archives; one of my biggest problems with the sort of art I do is storage, as I don't have any shelving space, so every model ends up being binned, dismantled, or boxed up after use, the 'saved' models eventually getting ground to bits or damaged by damp in the loft, which since the foster kids moved in seems to be the only surface not covered in teddy bears and books about dogs called Spot.  And that's before even getting to the issue of storing photographic prints, research materials and books... Oh to have a space to properly archive and display old work. 


Speaking of archiving, this is inside a Travelling Post Office train.  Right now I'm self employed as a photographer, and also properly employed in another job (my record was having three 'proper' jobs alongside the photography).  Again, now that the box room which was the office is now a bedroom, all the paperwork is stored in old metal filing cabinets liberated from the skip in an old job, and stored inconveniently under the stairs.  Oh to have a lovely wooden shelf, with lots of pigeon holes for storing invoices, receipts etc... Hell, the TPO above would make a lovely office and workshop anyway.


And as with the Deltic, what sort of railway enthusiast model-maker wouldn't want a railway on the dining room table?  There is just something wonderful about this, an O-gauge layout built onto a properly finished, craftsman-quality table for the training of signalmen.


OK so its a bit Wallace and Grommit, but that's part of the charm.  

National Slate Museum, Llanberis, Wales


Working in the shed?  Family want to contact you?


Speaking of contact, what a nice old phone; having to wind the handle before contacting an operator, makes the whole answering of the inevitable PPI company or speaking to relatives more of an event.  And the bells are humorously prone to comment and innuendo.


Back to the 'archiving old work' problem again with this one, but a lovely set of drawers and cupboards...


...and terrific organisation in a workshop.  My minor OCD when it comes to sorting out nails and screws would have a field-day with this.


Whilst on the subject of workshops, a proper ancient wooden bench, and a vice which looks like it weighs half a ton.


Tools scattered in random boxes and cupboards?  Not any more, not with a ridiculously complex tool rack on the wall.


And I couldn't resist a shot of the pattern-store.  Again, shelves full of lovely hand-made components.  They may or may not ever be used again, but are such lovely objects in their own right, and each the result of hours of patient craftsmanship.

Ingrow Loco, West Yorkshire


OK so this definitely falls into the 'nice but essentially useless object' category, as I cannot think of much use for this shunting-signal beyond its original purpose in a goods yard, but isn't it a lovely bit of kit?  Signal arm, lamp, levers, all in wonderful cast iron.  Maybe in the dream-mansion or workshop it could be used to let relatives know if you're locked away building things in the shed... or perhaps a gloriously over the top way of assuring people the bathroom is locked and in use.

Pieces for Places, Barmouth, Wales


The ultimate in useless but wonderful objects; I don't know if this is even for sale in this shop of very have-able designer goods, but good grief, isn't it magnificent?  A massive chandelier made from reclaimed railway signal lights.


If I had a massive house and a fortune, that would be hanging about the stairs in the palatial hallway.

Right, I think I've got all that dreaming and wishful thinking out of my system for a bit.  Normal service, i.e bodging slightly suspect-quality models out of smashed airfix kits and cheap stationary products, will resume shortly.


Thursday 17 September 2015

Daleks conquer, destroy, exterminate, and distract from important projects...

 
So recently, for a competition on the Dr Who BBC site, I ended up doing a short film using miniatures...  There's lots of information over on the Ribbon blog about it, so I wont duplicate here, so here's the link if you want to know more.  http://ribbonartandphotography.blogspot.co.uk/2015/09/mission-dalekwhat-is-it-all-about-then.html
 
Just look for any post with Mission Dalek at the start.


Dalek distractions aside, it will be a return to working on the massively complicated Steampunk Jaberwock project shortly...


Saturday 1 August 2015

Attack of the Mecha Spider...

 
As promised, a little more detail on the build of the robo-spider.  As mentioned in the last post, this was a bit of work done for an old friend from Uni days.  She is part ofr a group called "The Lakes Collective", a group of mixed-practise artists in Ambleside, Cumbria.  Every year they have a big arts event at Rydal Hall in the village, and tend to do an open-call sculpture piece.  The theme for 2015 was "Swarm", and having failed to enter the "Flock" call in 2014 due to a change in personal circumstances and work generally being busy, I was determined to enter this one.  Having toyed with doing something Steampunk, I ended up agreeing to a rather bigger Steampunk build for this group in 2016, so I decided instead to stick with what I knew and cobble something together with bits of model kits and toys...  It had to be plastic rather than my preferred method of using card bits, as it needed to survive a few weeks exposed in the Cumbrian rain.
 
In terms of background to the project, it ties in with some experimental work I've been doing for a personal project called "The Iron Monsters" about mechanical, self-aware creatures, but more on that in a future posting.
 
There's a bit more on the general photography blog here:  http://ribbonartandphotography.blogspot.co.uk/2015/05/swarm-at-rydal-hall.html
 
 
The starting point was the bits-box... lesson here, never throw anything away.  A mass of bits leftover from previous builds, mainly from the Steampunk and Model Village projects.
 
 
At this point I thought I'd still have time to make several spiders, so was trying to see if I had enough components to make a few of them.  The basis for each was going to be a cobbled-together mix of the 1/32 and 1/48 cheapo toy tanks bought for the Model Village.
 
 
I quickly realised I wouldn't have time to make three spiders, nor did I have quite enough parts, so I decided to do one big spider and build a web for it to sit in.  As the above picture shows, it really was thrown together with bits and pieces, the majority are cut-up toy tanks, the legs leftover from wind-up train sets, and then anything else which looked vaguely right was glued on.
 
 
For the flies in the web, they were built around some Poundland knock-off versions of the old Micro-Transformer toys (from the 80's), these were bought many years ago to donate parts for the abandoned spaceship project.  Again, never throw anything away...
 
 
A bit of a quick and dirty build this, the wings were hot glued on from cellophane packaging material... these could be fairly crude, as they would be wrapped up in the web.
 
 
I've always thought a coat of primer does wonders to tie a design together...


The painting was very quick, it was sprayed black then lightly dusted with bronze and copper spray.  I had thought about doing some more detailed work, but it didn't seem to need any more painting; it would be seen from a distance anyway.

 
It was then sprayed with varnish, then sprayed again, bearing in mind that it was going to get very wet in Cumbria...
 
 
Installing it at Rydal Hall involved a lot of cable ties on the tree, amongst the many other sculptures which people had contributed.


The web was made from cheap wire mesh, attached to a suitably large bit of fallen tree I'd picked up after a storm at work.

 
So that was that.  Not quite what I'd originally planned, but it was nice to do a build like this after a while of being out of practise; at the time I made it, it was the first big-ish model making project I'd done for a while, and it was nice to get back into doing work like this.
 
Next, maybe a post about the upcoming mega Jaberwock project, or something railway related.