Tuesday, 10 October 2017

Jabberwock Pt.29: Installing


Pretty much everyone who has seen the monster under construction in the cellar for the last nine months has made comments -with varying degrees of sarcasm- about how I’d never get it out of the bloody cellar.  However I had planned this to the last detail, and with only a few cuts and bruises, an agonisingly painful back, and a litany of cursing in both English and Polish I was able to get the whole lot upstairs out of the cellar, into the yard, and out to the car in a mere hour or so.  Apparently option two, of rebuilding the house so the Jabberwock could rise, Terrahawks-fashion, out of the hinged-open house, wasn’t practical or within budget for my In-Laws.


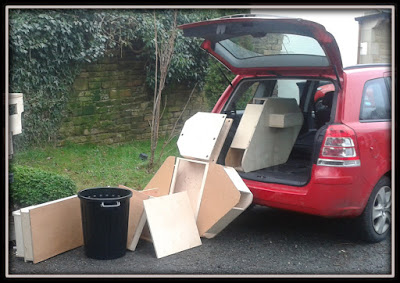
As a slight nod to the fact that this is also a lease-scheme car and we didn't want to wreck the interior, a tarpaulin was put down...


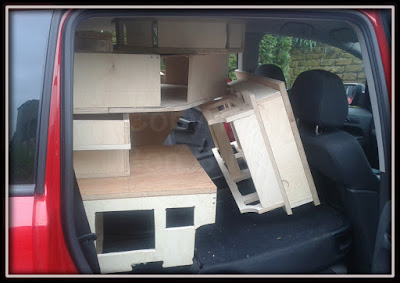
By 11pm both cars for the convoy were loaded up with the Jabberwock, the Rocking Horse Fly pieces, the Cheshire Cat, and Amy's Card Arch, Pig sculpture, Crockery sculpture, two toolboxes, 12 prints, cards, changes of clothes, snackage, stepladders, and other misc supplies.  And so it was off to bed for a few hours sleep before a drive out to the Lakes.


As the pics show, pretty much every spare inch in the car was filled with the Jabberwock.

Bright was the day and warm the song in our hearts when we sprang out of bed on Saturday, cheerful and ready for putting the work on display.

Not really. We dragged our complaining carcasses out of bed and groaned our way to the cars for the trip to the Lakes at Stupid-O’Clock in the morning.  Deciding, with a car full of wooden sculpture, to forego my usual reckless and cavalier attitude to driving, we took a slightly leisurely trip to Ambleside, still managing to encounter annoyingly slow drivers, dangerously fast drivers, lethal overtaking manoeuvres, speed-traps, and tractors.  Arrival was just after 8am.

Because we are suckers for pain, we'd also taken on an exhibition commission for some of our photography prints elsewhere in the grounds of Rydal Hall, which was the first priority.  Putting the photography show up in the Tearoom occupied much of the first hour, and was a nostalgic jaunt back to the days of showing work at Vicars CafĂ©-Bistro in Saltaire, in that not one wall was completely flat or straight which makes hanging framed work utterly hilarious.

Whilst I was assisting with that (the main job of drilling holes into the stone walls of what was probably a listed building being wisely left to one of the site staff, as I didn’t want to be responsible for an ancient building dropping around my ears) Amy was busily installing her sculpture work out in the formal gardens, then hanging rocking horse flies around the grounds alongside Clare, our friend who had organised the show.

With the tearoom sorted, and with enough caffeine in my system to make my already jangling nerves sing under tension, it was time to move the Jabberwock into position.  And I realised two things:
I really should have argued more about having the Jabberwock near a gate, rather than in the corner furthest from the nearest road access with two flights of steps to negotiate, and, once again,
I really should have made the damned thing lighter.  Or bought a trolley to move it with.  Or a Chinook.


The original location planned for the Jabberwock had been a flowerbed, but to my distress (though it has to be said, not my surprise given the way things were spiralling out of control) it had been heavily cut back and was a bit too open and exposed, somewhat ruining the whole ‘monster in the woods’ angle I’d been hoping for.

The newer location we hastily found nearby though was actually somewhat better, consisting as it did of a plateau the far side of some decorative stone walling.  I hoped anyway it might make things slightly more obvious that this was a sculpture and not a climbing frame as it is an area which the public are not allowed into, and it also had lots of tree cover around it.


Shifting the stuff into position, somewhat laboriously.


As for the weight of the monster, even with two (later four) of us shifting it I realised the downside of having built the thing from reclaimed 15-18 mil ply, and building it to battleship-levels of construction with so much reinforcing and extra bolts to hold it all together.  OK, so that dismantled furniture was a good source of free wood, but by heavens it was heavy, and my back was in quite a lot of pain by the time it was all dumped in a heap.


Putting it together was even more intricate, as there is a hell of a difference between building something in a workshop (well, cellar) on a table raised up 3ft off the ground, and having to scrabble around in brambles and nettles on the floor to try and tighten bolts and screws.


Some hours later though it was assembled, and then an hour or so was spent fitting the details to it (whilst Clare, Amy and her dad went about finding a good spot to put the Cheshire Cat sculpture, and generally trying to hide their boredom and annoyance with my poor planning for the timescale of assembly).  A last dusting with spray paint and a slight sense of anti-climax later, it was installed. 

The anti-climax was largely a result of a failure of one last crucial stage of the project…


Back in the earliest stages of the planning, I'd decided that the Jabberwock would make sense in the context of a machine which had fallen into Wonderland, and had been discovered by, and was under the control of, a group of small (and somewhat oppressed) creatures who were using it for a light spot of revenge and intimidation.


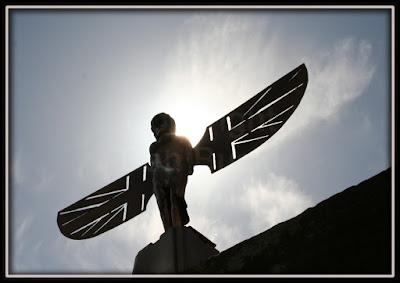
They needed to be anthropomorphic and small, so I decided to revisit something from the earlier Britannia, Steampunk, and an aborted-project based on the story of the Cottingley Faeries.  The above sculpture from those shoots representing one of these figures, which had passed into the imaginary folklore of Britannia.


I decided that it would be a nice juxtaposition for this build, having a race of 'cute' Faerie-type creatures piloting this monster, but with the build overrunning with the bad weather, the plan to make a series of figures went by the wayside.  In the end I laser-cut some figures after work one night, modifying a design I'd done for a student on their Story-Chair project.


Hastily assembled and painted, they were unboxed on site, only to find...


...they were broken or coming unstuck.  There was no safe way to secure them on the monster, and it all felt like a rush as I wasn't happy with the design.  The figures were more fragile than I’d hoped, and with time running out on location, mending them to then find a way of gluing them in place didn’t seem to be an option, particularly with three other people who were tired and hungry waiting for me to wrap-up. 

So regrettably the idea was ditched, which did mean certain aspects of the sculpture wouldn’t make sense.  But after 4 hours sleep in 48, and the day of dragging it all into place, I decided to abandon the idea of a crew, and maybe go have an exhausted little cry somewhere.  In context (and in hindsight) it makes slightly more sense to have it abandoned, and the idea of it being a 'dead' thing which has been left there to scare people.

It was there, in place, anyway, now left to survive the unpredictable ravages of weather and vandalism.  The Steampunk Jabberwock...

Jabberwock Pt.28: Paint Your (metal, well wooden) Dragon...


With a couple of weeks to go until the deadline, it was time to paint the Jabberwock.  I strongly doubted the sculpture was going to survive the show, so I wasn't going to too much effort into detail-painting it.  I bought a big tub of wood stain from Wilkos, the sort usually used for fences.  How well it was going to work on location I didn’t know, because there were several varieties of wood in this thing, but it seemed the most economical alternative.

Of course, the problem is also that a lot of the sculpture is a bit on the fiddly side, and tricky to paint, so for these bits (the majority of the caterpillar tracks, the neck etc) I cheated a bit and used spray paints.  Which presented yet another problem as it meant that the parts of the model needing to be spray painted, also therefore needed to be dragged upstairs, through several doors, and a kitchen.  Who needs a gym?

With problems multiplying like randy rabbits, the weather (with mere weeks until the deadline) suddenly turned from spring unseasonably-warm sunshine and no breeze, to wind, rain, sleet, thunderbolts and lightning, very very frightening. 


For instance this was the morning of the day I'd planned to spray paint the caterpillar tracks... and a slightly unseasonable fall of snow.  Which delayed things somewhat...


The overall colour scheme of the model is something that caused some questions during planning.  This is meant to be a machine which has been taken over, and is generally a bit derelict and battered, then left out to the mercies of the weather.  No shiny paint jobs here or polished brass here.  In terms of visual inspiration I was thinking rust, rust, and more rust, taking particularly the vertical-boiler crane at Llanberis Slate Museum as an inspiration, and also a handy rusty brazier that was lying around the yard where I was painting.


Once the main bodywork and the more detailed bits were painted in rough colours, the plan was to re-assemble all the parts and then after the final detailing pass, to basically do an up-scaled version of how I painted the concept models, and dust it all with a variety of rattle-cans to achieve a bit of consistency (which should go some way towards hiding the slight variety of materials used throughout).


Some of the many tins of spray paint needed when covering the more fiddly bits of the sculpture, like the caterpillar tracks...

And then with time running out, it bloody snowed.  And hailed, and rained, and bloody well snowed some more...


Jabberwock Pt.27: The Final Push...


When I started this build, I had an intricately worked out timetable for building the Jabberwock, bearing in mind I would only be able to work Sunday afternoons and the occasional weekday evening due to real life concerns and the job (as mentioned some time before, when I first agreed to do the build, I didn’t have three foster kids living with me, I had a spare room, and weekday-days off with nobody else around).

The timetable inevitably slipped, but in an unusual nod towards efficiency I’d built-in recovery time.  I gave myself a month for the last little bits of and details, and to get it painted, in the warmer, drier weather which comes in April.

Hah.

Hahhahahahaaaaa.


Detail of the interior gubbins of the caterpillar tracks, which would be visible through the various rips and cracks in the plating.  As with much of the other detailing the idea was to give a hint of machinery inside, so it was all scrap wood, and rollers from paint tubs, and bits of delivery crates which would form the basis of the mechanical parts.


The caterpillar tracks themselves were represented from cut-up lengths of broom handle and bits of strip wood.


The wings were made from a dead camera tripod, with the material from an equally dead tent which was suitably cut apart (more free stuff from another 'job', in this case from being a Scout Leader).


With time to the exhibition ticking merrily down, the thing was essentially built, and ready for painting... or so I thought...


In a month with many a distraction stopping me getting the painting and final assembly done, and God's apparent weather-based displeasure with the project (it is difficult to spray-paint outside in a gale or snowstorm), I hit the end of the week before the show.

Having been forced to paint most of the bits separately in the cellar, apart from the bits which needed spray painting when I'd managed one dry afternoon outside to get it done (see the separate post on the painting process), I thought I probably ought to actually build the Jabberwock up as a final test.

The plan was that, on the Thursday evening before the show, I would cart all the bits up out of the cellar and bolt it all together, for the final detailing pass and some work with a spray can to bring it all together.  A major issue of building a 10ft-high sculpture in an 8ft-high basement is that it couldn't all be put together at once at once.  At which point of course the forecast week of hot, dry weather was replaced AGAIN by torrential winter showers, with snow, hail, sleet, rain, and gales.

No test assembly, no final spray painting, but a lot of panic to compensate.  But I decided it was the sort of weather it would be enduring anyway, so decided to just get on with it.  


Aaaaaaaaand then, at about 11pm on the Thursday, the realisation of yet another major problem; the monster would be, as I’d begun to fear, front heavy, and either topple onto somebody, or dismantle itself.

See, back in the early days of the design, the neck and head were going to be quite lightweight and made from washing line poles, but along the way I realised this would make it too fragile.  So I made the head from wood, which increased the forward weight, which meant a wooden neck was needed, which made it still heavier.  I also chose to drop the design for the front Cowcatcher, as it would have precluded the whole thing being transported in a single vehicle.

Typically these decisions came back to bite me in the backside, and whilst the sculpture wasn’t about to topple over or anything without provocation, it did mean that if some little darling decided to grab the neck and hang onto the Jabberwock, the sculpture would probably topple over.  Now I’m not adverse to vandals being squashed by giant sculptures they are trying to break, but I suspected it would produce an inconvenient amount of paperwork and trips to the Small-Claims Court. 

So on the Friday, with just over 18 hours until installing the work, I fabricated a sturdy box-like structure which was disguised afterwards (with a lot of scrap flexiply) as a cowcatcher, finishing it mere minutes before teatime on the Friday, and leaving it to dry whilst I packed the car.


Somewhat out of sequence, but I was so panicking about building and painting the cow-catcher/support that I quite forgot to photograph it under construction  As can be seen, it is basically a box with a long base which could be hidden, supporting the weight of the whole sculpture on the front.


Oh and due to a piffling miscalculation about the calendar, the lease on the small Skoda was now up and the car had gone back to the dealership (to be sold on to the next poor sod who hadn’t realised what my regular speed-bump-laden commute to the Day Job had done to the suspension).  This meant that Amy and all her sculptures were going to need to be fitted into the car as well as the Jabberwock, the Rocking Horse Fly pieces, the Cheshire Cat, the toolbox, some framed prints, and more besides.  Happy, we were not.  Luckily, Father in Law offered to help drive, in his Bigger Skoda, which gave a little more room for the sculptures, us, and the mass of other stuff we'd be taking with us.

Finally, at around midnight on the Friday, everything seemed as ready as possible...

Jabberwock Pt.26: Sticking my neck out...


A new working design sketch, showing the modified neck.


The actual head of the monster was pretty easy, designed to look a bit equestrian, but also following the crane design from Ingrow Station.  A box (matching the dimensions of the one on the base of the neck), and a couple of bits of ply cut to shape with some additional holes cut out with forcner bits, to take lengths of broomstick (which would represent bits of the mechanics for supporting the chains and cables, eventually)


The neck was a different problem altogether.  It needed to be lightweight, and not too long, so it would fit in the car.  The initial plan was to use washing line poles which would be collapsible, and thus extend to be quite long.  It could then be reinforced with wooden formers to hold the poles in place, and other detailing, and disguised with tarpaulins.

However, with the head built from wood, suddenly the washing line pole idea was out as it would be too weak.  I toyed instead with lattice-work garden trellis, but it was too costly.

The only, depressing, option, was to build it myself at work after-hours from scrap…


A strong basic framework was built, then a second built as it way too short on its own.


The interior girders were very rough and ready, on the basis that it would be draped in material in the end and not really visible.


To attach it together, it was designed to fold over with two very big, strong sets of hinges on the top surface.  Folded over though, it would slot under the frames in the car...


The cross-section of the neck was sized for the neck, which had an additional baseplate screwed on underneath, to help support the considerable weight of the neck and head.

Jabberwock Pt.25: Test-fitting it in the car...


At this point, I decided to see how much of a hernia I would be giving myself moving the damned thing, and shifted the bits and pieces upstairs to see how they fitted in the car.  Early evidence pointed to the fact I wouldn't be needing a gym membership this year.


Actually it wasn't too far off the transport plan produced before the build started, it just needed some re-arranging, not bad considering the caterpillar tracks had changed shape from the original sketches.


It wasn't going to be pretty however, and as the caterpillar track module on the left shows, it really was down to every last centimetre in places...


So, back to the cellar, for the next stage of the build... the head and neck...

Jabberwock Pt.24: Front and Back Bits


Two more important elements to be attached are the support base for the crane at the front, and the footplate/bunker at the back.  These were designed to slot-on to the main chassis, and be secured with coach bolts and wing nuts.

In another moment of up cycling, the rear coal bunker would be constructed from the remains of a piece of furniture built for “The Home Is…” project.  The second set we began building for that shoot, but abandoned, was for a bedroom.  Abandoned largely because we ran out of time to shoot it, and also because those bloody Premier Inn adverts also started doing scenes with beds out in the great outdoors.  Curse you, Lenny Henry.  The bedside cupboard actually began life as part of a long-scrapped computer desk we had, so it is technically onto its third incarnation now on Jabberwock.


The hole for the neck would basically be an angled box into which the neck would slot; at this stage the plan was for a neck built from four telescopic washing-line poles, which would slot-through several pieces of wood which form them into a long box-girder shape, more on which in the update dealing with the neck, head, and problems which cropped up at that stage...


...in the meantime a base was made which slotted onto the front of the chassis...


...with the angled box on the top, which to support the weight of the neck/head...


...was attached to the mounting plate with the usual belt-and-braces approach, which was helping to keep my local branch of Screwfix in business.

So with the basic shape of the monster done, I remained unhappy about so much stress being placed on the joint between the cat-tracks and the body, so decided to make a pair of hidden supports to sit under the chassis, and which would help take some of the load.  This took a while, as they were built to the same gloriously over-engineered standard as the other load-bearing parts.  Its not going to win me any awards as a carpenter, but if it allowed this beast to survive a month exposed to the great Cumbrian outdoors, then I’d be happy.


At this point it was all coming together nicely, but I thought I better check if it actually could be moved...